This guide was last updated on June 2, 2009.
1. Overview
This section contains an overview of the Context-aware Activity Notification System (CANS), the License, Requirements, and Contents list of CANS.
1.1 What is CANS?
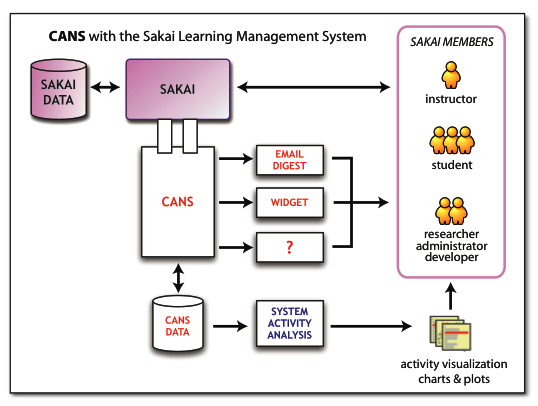
CANS is a notification system for online communities that is designed around the importance of a user's social context and personal notification preferences. CANS was built with a focus on why, when, and where users receive awareness information and how that information can be used to derive meaning from the activity occurring in the collaborative community.
1.2 License
Context-aware Activity Notification System (CANS)
version 2.1.0 May 27, 2009
(c) 2005, 2006, 2007, 2008, 2009 Chris Amelung
chris@cansaware.com
This software is licensed under the Educational Community License Version 1.0 (the "License"); By obtaining, using and/or copying this Original Work, you agree that you have read, understand, and will comply with the terms and conditions of the Educational Community License. You may obtain a copy of the License at:
http://www.cansaware.com/node/6
1.2 Requirements
CANS Requires Java v1.5.x or later; ant v1.5 or later; relational database (MySQL or Oracle), telnet client (for testing).1.3 Contents
This release is organized as an ant project. (What is this?)
- -build.xml
- - config/
-
- - cans_config.txt
- - cans_events.txt
- - email_template.xsl
- - extras/
-
- - events.txt
- - lib/
-
- -- collection of needed .jar files
- - LICENSE.txt
- - logs/
-
- - administrator_log
- - consumer_log
- - error_log
- - producer_log
- - README.txt
- - src/
-
- - cans/
-
- - Administrator.java
- - CANSDataStore.java
- - CansSetup.java
- - Client.java
- - ConnectionManager.java
- - Consumer.java
- - hbm/
-
- -- various hbm's and POJOs
- - NotificationProcessor.java
- - NotificationSummary.java
- - Producer.java
- - RunDailyDigest.java
- - StartServer.java
- - SubscriptionEvent.java
- - SubscriptionService.java
- - User.java
- - hibernate.cfg.xml
- - log4j.properties
- - util/
-
- - HibernateUtil.java
2. Installation
This section contains information on how to setup your database, configure CANS, Initialize CANS, and test CANS for successful installation.
Note: These instructions assume a CANS installation in a user's home directory, but this is not a requirement. Choose your own installation location and adapt these instructions accordingly. ~/ will be used to represent the root of the CANS installation directory.
These instructions also assume you'll be using the MySQL database, but you may try other databases.
STEP 1: Setup your Database
Download the MySQL 4.1 version for your platform. Other versions may work, but have not been tested.
Install the database. (See http://dev.mysql.com/doc/refman/4.1/en/installing.html for more information.)
Create a database account (from a terminal prompt):
/usr/local/mysql/bin/mysqladmin -u root -p create <database-name>
/usr/local/mysql/bin/mysql -u root -p
grant ALL PRIVILEGES on <database-name>.* to <database-user>@localhost identified by '<database-user-password>';
quit
STEP 2: Configure CANS
1. Open ~/config/cans_config.txt. (Part of your download.)
2. Enter a real email address for email_from
3. Edit ~/src/hibernate.cfg.xml with values for your specific database. Don't forget to enter the username/password for YOUR database account
4. Add the connector jar for your database to ~/lib/
(optional) Edit ~/config/cans_events.txt. You may add or remove Sakai events from the list.
STEP 3: Initialize CANS:
cd ~/
ant init
You should connect to your database and verify that there's an entry in the following tables: environments, users, accounts
STEP 4: Test CANS
ant test_run
prepare:
compile:
test_run:
[java] ###########################################################
[java] #___________________Welcome to CANS_______________________#
[java] #_________________________v2.1.0__________________________#
[java] #_________________________________________________________#
[java] #__Copyright (c) 2005, 2006, 2007, 2008, 2009_____________#
[java] #__Chris Amelung__________________________________________#
[java] #_________________________________________________________#
[java] #__Licensed under the Educational Community License_______#
[java] #__Version 1.0 (the "License");By obtaining, using________#
[java] #__and/or copying this Original Work, you agree that______#
[java] #__you have read, understand, and will comply with the____#
[java] #__terms and conditions of the Educational Community______#
[java] #__License. You may obtain a copy of the License at:______#
[java] #_________________________________________________________#
[java] #__http://www.cansaware.com/node/6________________________#
[java] #_________________________________________________________#
[java] ###########################################################
[java] -- WHOLE BUNCH OF HIBERNATE CONFIG STUFF OMITTED --
[java] Launching CANS. Please wait...
[java] --estabilishing communication port for consumer clients... ok.
[java] waiting for a consumer.
[java] --estabilishing communication port for producer clients... ok.
[java] waiting for a producer.
[java] --estabilishing communication port for administrator clients... ok.
[java] waiting for a administrator.
[java] startup complete.
You'll notice that CANS did not exit (no UNIX command prompt). That is because CANS is a server and is now waiting for something to happen. Type Ctrl-C to quit CANS.
3. Running CANS
Commands | Description |
ant compile
|
compiles the java src files and deploys class and configuration files in a ~/bin/ directory |
ant init |
complies the java src files and initializes the CANS database |
ant test_run |
compiles modified java src files; deploys changes to ~/bin/ and starts CANS by running StartServer |
ant run |
compiles modified java src files; deploys changes to ~/bin/ and starts CANS by running StartServer as a background process |
ant email |
runs the RunEmailDigest file to distribute email digests on a 24 hour cycle |
ant clean |
deletes entire ~/bin/ directory |
cd ~/ ant run |
Do the following to make CANS run as a background process |
export JAVA_OPTS="-server -Xms520m -Xmx520m -XX:PermSize=16m -XX:MaxPermSize=128m" ant run |
You may want to create a startup script for CANS and allocate the appropriate amount of Java memory to CANS. To create a startup script, just add to the following two lines to a file, save it to ~/ and give it executable permissions. |
4. Testing
Testing CANS and Producing Events
Following the instructions in installation, you will have a CANS installation setup for testing. Make sure CANS is running, then do the following to verify you can receive events and create notifications.
You can test CANS without Sakai or any other environment or widget by using the oldy-but-goody telnet program.
Open a new shell or Terminal window and type the following to connect to CANS as an Event Producer:
You should see the following response:
Connected to localhost.
Escape character is '^]'.
This means you successfully connected to CANS and it is waiting for an event from you. In this version, CANS will wait indefinitely for an event. Type anything you want. For example:
You will get:
You must speak in a language CANS understands to communicate with it. Anytime CANS receives something it doesn't understand it simply breaks the connection. There is no "please try again."
To send a real event to CANS, reconnect with the above telnet command and then type (copy and paste) the following (make sure it is all one line when you paste it into your telnet window).
To verify that the EVENT went into CANS, look in your database:
Feel free to send this same event to CANS as many times as you like.
5. Run w/ Sakai
Running CANS with Sakai
To use CANS with Sakai version 2.5.x or greater, you'll want to checkout a copy of the Activity Monitor tool and services from http://source.sakaiproject.org/contrib/cans/cans_AM/trunk/
A big THANK YOU goes out to Zach Thomas (http://www.aeroplanesoftware.com) for his most excellent work on this tool.
STEP 1: Download
Download this tool to your Sakai source directory. This download includes everything you need for using CANS with Sakai.
svn co http://source.sakaiproject.org/contrib/cans/cans_AM/trunk/ cans
STEP 2: Configure
Open the file pack/src/webapp/WEB-INF/components.xml
For reference, open the config/cans_config.txt file (refer to STEP 2 in CANS INSTALLATION previously)
In the CansConfigService bean, set the following properties:
- host: this must be the same as cans_ip in config/cans_config.txt
- userId: this must be the same as admin_id in config/cans_config.txt
- password: this must be the same as admin_pw in config/cans_config.txt
- consumer: this must be the same as consumer_ports in config/cans_config.txt
- producer: this must be the same as producer_ports in config/cans_config.txt
- administrator: this must be the same as administrator_ports in config/cans_config.txt
- eventsToMonitor: this list should contain the same events as you have in config/cans_events.txt
STEP 3: Deploy
You may now deploy this tool to your Sakai installation just as you would with any other Sakai 2.5.x tool.
I use this Maven command:
mvn install sakai:deploy -Dmaven.tomcat.home=/usr/local/tomcat
STEP 4: Run the Tool
After you start Sakai back up, add the Activity Monitor tool to one of your existing Sakai sites.
To learn how to configure and use the Tool, view these comprehensive instructions written by Krista Galyen: http://fipse.missouri.edu/guides/am/
STEP 5: Verify communication with CANS
After you create a Notifier in the AM Tool, you'll want to verify that the proper information is getting sent and stored in CANS.
Connect to your CANS database on your CANS server and verify you have values in the following database tables.
A new context will be added for the Sakai site.
User accounts will be created for the users you chose to monitor and notify.
select * from accounts;
A notifier record will be added for the new notifier in the AM Tool.
These events will match the events you selected to monitor in the AM Tool.
Various subscriptions will be created for the notifier.
STEP 6: Verify notifications are created
In Sakai, go into the Site where you created the Notifier and generate the events you selected for the new Notifier. For example, if you chose to monitor content.new events, add a few files to Resources.
In the CANS database, see if any notifications are getting created for these events.
First, you should see these raw events in the events table.
You should see notification records for each event.
You should see various entries in this table that correspond to the events and users being notified.
At this point, you can trust everything between the AM Tool in Sakai and CANS is working properly.
STEP 7: Send the notifications
In the CANS source directory, run 'ant email' to start the CANS email process:
ant email
6. Config Index
Configuration | Description |
cans_ip=127.0.0.1 |
The IP address for your CANS server. |
cans_version=2.0.1 |
The version of the CANS Server. This number is displayed on the CANS startup screen. |
consumer_ports=5440 |
The port(s) CANS communicates over for notification requests. IOW, when the Sakai Activity Monitor
Tool asks CANS for new notifications, communication occurs over this port. If you have Sakai and CANS running on different servers, it'll be important to make sure your
CANS server allows communication over this port from your Sakai server. |
producer_ports=5441 |
When the WatchDogService in Sakai sends new events to CANS, communication occurs over this port. If you have Sakai and CANS running on different servers, it'll be important to make sure your
CANS server allows communication over this port from your Sakai server. |
administrator_ports=5442 |
When the Activity Monitor tool in Sakai sends new/edited Notifiers to CANS, communication occurs
over this port. If you have Sakai and CANS running on different servers, it'll be important to make sure your
CANS server allows communication over this port from your Sakai server. |
email_client=JAMES |
A flag that tells CANS to send notifications using Sakai's James email server. This is a new feature and isn't fully tested. If you don't want to use James, change this value to anything else (ex. EMAIL) and then change the email_port. |
email_server=127.0.0.1 |
The IP address for your email server. |
email_port=8025 |
The port email is sent out on. Generally, you can use 8025 for James or 25 for standard email sever. |
email_from=EMAIL_ADDRESS |
The email "From:" address for your email notifications. The only value that MUST BE CHANGED on setup. |
email_start_delay=60000 |
The initial delay (in milliseconds) before the first set of email notifications will be sent. |
email_period=86400000 |
The period (in milliseconds) for which email notifications will be sent. Set for 24 hours. This system is a little cumbersome, so here's a production example: Let's say you decide to start the email process, with "ant email" at 11:00 AM and you want your notifications to be sent out at midnight each night. You have 13 hours from 11:00 AM to MIDNIGHT. 13 hours = 46800000 milliseconds. email_start_delay=46800000 // 13 hours email_period=86400000 // 24 hours |
env_name=Sakai |
The name for your system that will be using CANS. |
env_type=LMS |
LMS = Learning Management System |
env_code=sakai |
A unique code to identify your LMS. Don't change this one unless you really know what you're doing. |
env_url=http://127.0.0.1:8080/portal |
The URL to the file storage for your LMS. |
admin_fname=Sakai |
The first name for the administrator account in your LMS. |
admin_lname=Administrator |
The last name for the administrator account in your LMS. |
admin_id=admin |
This must be the unique user id for the administrator account in your LMS. |
admin_pw=PASSWORD |
This is not the password for your Sakai administrator account. This value must be the same as the one you set in pack/src/webapp/WEB-INF/components.xml |